

Create a Minimalism GitHub Page for Your Data Science Portfolio in 30 Minutes
In the early days of my journey in data science a year ago, I spent most of my time reading articles on Towards Data Science to create my own Data Science roadmap. The opinions are different in the knowledge one needs to acquire to become a Data Scientist and how to get there, but there is one thing in common: at a point in that journey, one should have a portfolio where she can host her Data Science projects.
I created my first portfolio about 6 months after I wrote my first line of Python, when I completed the Python for Data Science and Machine Learning Bootcamp on Udemy, to host simple projects I had done during the course. Since then, building and maintaining my portforlio is one of my favorite things to do. I enjoy organizing my ideas, writing them down, explaining things and make them neat.
Having a portforlio encourages me to seriously document any projects I work on. For job search, I usually bring an iPad with my portfolio opened to career events and interviews so when I share about my projects, I can guide interviewers through my codes and visualizations. It is a very efficient way to build impression and maintain the conversations.
In this tutorial, we will step-by-step learn how to build a simple but powerful GitHub page to host your Data Science projects. The whole process will take about 30 minutes. Let’s get started!
Step 1: Create a GitHub Account
First, we need to sign up a GitHub account at https://github.com/.

After signing up, we will log in and move to Step 2.
Step 2: Create a Repository Named user-name.github.io
After all steps in this tutorial are completed, our GitHub page can be accessed at https://user-name.github.io. In this step, we will create a repository named user-name.github.io where user-name is the user name we use to log into GitHub. My user name is ktran3-simon so I will create a repository name ktran3-simon.github.io.
To create a new repository, we click on the + sign at the top right of the screen, next to our profile picture, and select New repository.

We fill the repository name with user-name.github.io, select Public and then click Create repository.

Next, we will upload the theme to this repository. The theme we will use is the Jekyll Minimal theme. This GitHub repository has a more concise version of the theme.

To download the theme, we go to https://github.com/evanca/quick-portfolio, click Clone or download and select Download ZIP.

Now, let’s open our newly created repository, which is still empty. We will click uploading an existing file. After downloading the theme, we unzip the file and upload these files into our repository. After the uploading is complete, we click Commit changes.

Now, by going to user-name.github.io, we can already see our website! In the next step, we will go through some instructions to customize our portfolio.
(Optional) A faster way to complete this step is to simply click the Fork button to copy the entire repository to our GitHub account and then change the repository’s name to user-name.github.io. However I think the above explanation is friendlier for first-time GitHub users.
Step 3: Customize Our Portfolio
Our GitHub page has a two-column layout. On the left is our profile picture and some description, and on the right is the main page where we present our projects. I really like this design because of its simplicity yet efficiency.

To customize the sidebar (the left part), we will edit the file _config.yml in our repository. We can also add Google Analytics ID to track and analyze traffic to our page.

To customize the main page (the right part), where we display our projects, we will need to edit index.md. This file is written in Markdown. If you frequently work with Jupyter Notebook, you must be very familiar with this language. Markdown is very easy to use. Here is a helpful Markdown Cheatsheet that I often refer to.

(Optional) More Customizations
As we customize the sidebar, we will see that we cannot edit the last two lines by editting _config.yml:

To remove them, we need go to the original repository of the Jekyll Minimal theme, and copy the content of default.html in _layouts. Then we create _layouts/default.html in our repository by clicking Creating new file and typing _layouts/default.html, paste the copied content here and commit.

Now we can remove lines 29-31 in _layouts/default.html to remove View My GitHub Profile,
<p class="view"><a href="https://github.com/chriskhanhtran">View My GitHub Profile</a></p>
and line 50 to remove Hosted on GitHub pages - Theme by orderedlist.
<p><small>Hosted on GitHub Pages — Theme by <a href="https://github.com/orderedlist">orderedlist</a></small></p>
Step 4: Upload Our Projects
After customizing the design of our GitHub page, we can start adding projects to the page by editing index.md. There are several ways to do that, including:
- Link to our GitHub repositories,
- Link to our Jupyter Notebooks,
- Write blog posts in
Markdown.
My favorite way to add projects is creating a folder in the repository to save the html files of Jupyter Notebooks, and add the link https://user-name.github.io/folder-name/file-name.html to my main page. Alternatively, we can insert Google Colab links so that viewers can run our projects directly. Google Colab is basically the same as Jupyter Notebook with GPU supported by Google, which helps increase the speed of running our cells, especially in Deep Learning projects. Here is a nice Google Colab tutorial. If you are an R user, you can use R markdown in R Studio to render your projects and export them in the html format.
We can also write blog posts in Markdown and upload them to our repository. You can always refer to the file sample_page.md as an example.
Tips and Tricks
Badges with Shields.io
In official repositories on GitHub, we usually see authors use badges to show the status of their project. For example:

I really like to use these badges to embed links with call for actions, such as:

You can go to https://shields.io/ to create your own badges. Basically, we just need to create links in a specific format and use them as image links.
Format:
https://img.shields.io/badge/label-message-color?logo=logo_name
where:
colorcould be brightgreen, green, yellowgreen, yellow, orange, red, blue, lightgrey or any HEX, RBG color codeslogo: the list oflogoof popular brands and their brand color codes can be found at simple-icons- Visit shields.io to learn more
Examples:
https://img.shields.io/badge/Spotify-My_Musics-1ED760?logo=Spotify will give us:
https://img.shields.io/badge/PyTorch-Run_in_Colab-EE4C2C?logo=PyTorch will give us:
To insert links with badges we created, we only need to type [](link-to-our-project).
More Themes
There are several other themes that we can utilize to be more creative with our portfolio. To use them, we can simply Fork the repository to our account and change its name to user-name.github.io.
- Cayman: repo - preview
- Minimal Mistake: repo - preview. I really like this portfolio where the author uses this theme.
 A preview of the Minimal Mistake Theme
Content of Your Portfolio
Last but also the most important thing I want to say in this tutorial, the reason I like a minimalism theme is that it took me minimal time on designing works; thus I can spend more time on the content of my projects. Ultimately, the purpose of building a Data Science portfolio is to present our Data Science project, rather than to show our web-design skills. Below are some articles that I found super helpful when I started building my first portfolio.
- How to Build a Data Science Portfolio in Towards Data Science
- Data Science Portfolios That Will Get You the Job in Dataquest
- Building a Data Science Portfolio That Stands Out in Springboard Blog
- 5 Data Science Projects That Will Get You Hired in 2018 in Medium
Feel free to visit my portfolio to see how I write my Data Science projects. For example, this is a detailed notebook I wrote after completing a Kaggle competition, in which I went through all important steps of a Data Science project, including Exploratory Data Analysis, Data Cleaning, Feature Engineering, Modeling and Evaluation. Now I still often revisit this notebook to copy the cross-validation codes to reuse. I found I learn the most by reading notebooks on Kaggle and writing my own projects.
I also made some changes in my portfolio compared to the original version, such as making the sidebar narrower and the main page wider. You can fork my repo (https://github.com/chriskhanhtran/minimal-portfolio) and change the codes in the diretory _sass/jekyll-theme-minimal.scss as you like, including changing width, font size or image size. However, be careful when you do so because it might mess your page up. If so, just recover the settings by copying from the theme’s original repo.
- change
max-widthin.wrapperto change the width of the entire page - change
max-widthinsectionto change the width of the main page - change
widthinheaderto change the width of the side bar
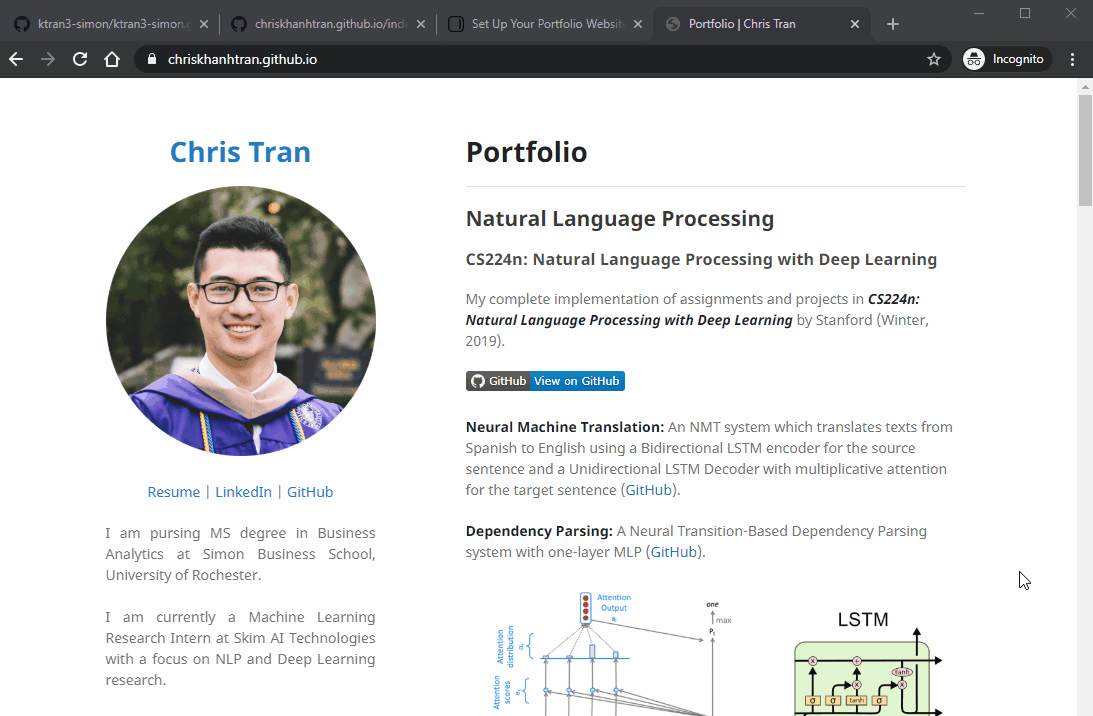 My GitHub Page
Last Words
Having completed your minimalism portfolio, you now can remove or modify these files in your repository:
- LICENSE
- README.md: you can modify it to the description of your page.
- sample_page.md: you can remove or change it to a blog post.
- pdf/sample_presentation.pdf
You can also visit the original tutorial with more tips such as:
- How to create thumbnails for your project
- How to create a round profile picture
For me, I use Photoshop and Powerpoint to create pictures used in my GitHub pages.
Thank you so much for staying with me to this point of my first tutorial. Don’t hesitate to reach out to me if you’ve got any questions. Please connect with me on LinkedIn and share with me your Data Science portfolio.


Leave a comment