Predict Ames House Price - Advanced Regression Techniques
__author__ = "Chris Tran"
__email__ = "tranduckhanh96@gmail.com"
__website__ = "chriskhanhtran.github.io"

Table of Contents
-
2.1. Sale Price
2.2. Numerical Features
2.3. Categorical Features
2.4. Correlations
2.5. Missing Values
3. Data Preprocessing and Feature Engineering
3.1. Missing Values
3.2. Outliers
3.3. Feature Engineering
- 3.3.1. Create New variables
- 3.3.2. Label Encoding
- 3.3.3. Transform Numerical Variables to Categorical Variables
3.5. Feature Scaling
3.6. One-hot Encoding
-
- 4.1. Regularized Regressions
- 4.1.1. Ridge Regression
- 4.1.2. Lasso Regression
4.2. XGBoost
4.3. LightGBM
4.4. Averaging model
- 4.1. Regularized Regressions
- 6. Reference
1. Introduction
After my first two data science projects solving classification problems, I am looking to expand my skill set by doing a comprehensive regression project. While taking Data Science micro-courses on Kaggle, I came across the House Prices: Advanced Regression Techniques competition. With 79 explanatory variables describing (almost) every aspect of residential homes in Ames, Iowa, this competition challenges me to predict the final price of each home.
The Ames Housing dataset was compiled by Dean De Cock for use in data science education. The data set describing the sale of individual residential property in Ames, Iowa from 2006 to 2010. The data set contains 2930 observations and a large number of explanatory variables (23 nominal, 23 ordinal, 14 discrete, and 20 continuous) involved in assessing home values.
First, I performed comprehensive exploratory data analysis to understand linear relationships among the most important variables and detect potential issues such as sknewness, outliers and missing values. Then, I handled these issues, cleansed the data and performed feature engineering. Lastly, I built machine learning models to predict house prices. By the time I write this notebook, my best model has Mean Absolute Error of 12293.919, ranking 95/15502, approximately top 0.6% in the Kaggle leaderboard.

Import libraries
import numpy as np
import pandas as pd
import matplotlib.pyplot as plt
import seaborn as sns

import warnings
warnings.simplefilter(action='ignore', category=FutureWarning)

%matplotlib inline
sns.set_style('darkgrid')
Load data
# Load data
train_data = pd.read_csv('Data/train.csv', index_col='Id')
test_data = pd.read_csv('Data/test.csv', index_col='Id')

# Seperate features and target variable
X_train = train_data.drop(['SalePrice'], axis=1)
y = train_data.SalePrice

# Concatenate train and test data
X = pd.concat([X_train, test_data], axis=0)
Describe data
print("Train data's size: ", X_train.shape)
print("Test data's size: ", test_data.shape)
numCols = list(X_train.select_dtypes(exclude='object').columns)
print(f"There are {len(numCols)} numerical features:\n", numCols)
catCols = list(X_train.select_dtypes(include='object').columns)
print(f"There are {len(catCols)} numerical features:\n", catCols)
Data dictionary can be found here.
2. Exploratory Data Analysis
2.1. Sale Price
plt.figure(figsize=(8,6))
sns.distplot(y)
title = plt.title("House Price Distribution")

The distribution of SalePrice is right-skewed. Let's check its Skewness and Kurtosis statistics.
print(f"""Skewness: {y.skew()}
Kurtosis: {y.kurt()}""")
2.2. Numerical Features
Top 10 numerical variables highly correlated with SalePrice:
corr_mat = train_data.corr().SalePrice.sort_values(ascending=False)
corr_mat.head(11)
What are the top 10 features selected by Recursive Feature Elimination?
from sklearn.feature_selection import RFE
from sklearn.linear_model import LinearRegression

estimator = LinearRegression()
rfe = RFE(estimator, n_features_to_select=10, step=1)
selector = rfe.fit(X_train.fillna(0).select_dtypes(exclude='object'), y)
selectedFeatures = list(
    X.select_dtypes(exclude='object').columns[selector.support_])
selectedFeatures
According to above analyses, Overall Quality, Living Area, Number of Full Baths, Size of Garage and Year Built are some of the most important features in determining house price. Let's take a closer look at them.
Overall Quality
Overall quality is the most important feature in both analyses. It is clear that higher quality makes the house more expensive.
plt.figure(figsize=(8, 6))
sns.boxplot(x='OverallQual', y='SalePrice', data=train_data, palette='GnBu')
title = plt.title('House Price by Overall Quality')

Living Area
Living area has a linear relationship with house price. In the scatter plot below, we can clearly see some outliers in the data, especially the two houses in the lower-right corner with living area greater than 4000 sqft and price lower than $200,000.
def plotCorrelation(variables):
    """
    1. Print correlation of two variables
    2. Create jointplot of two variables
    """
    # Print correlation
    print("Correlation: ", train_data[[variables[0],
                                       variables[1]]].corr().iloc[1, 0])

    # Create jointplot
    plt.figure(figsize=(6, 6))
    sns.jointplot(train_data[(variables[0])],
                  train_data[(variables[1])],
                  kind='reg',
                  height=7,
                  scatter_kws={'s': 10},
                  marginal_kws={'kde': True})


plotCorrelation(['GrLivArea', 'SalePrice'])

GarageCars
Interestingly, houses with garage which can hold 4 cars are cheaper than houses with 3-car garage.
plt.figure(figsize=(8, 6))
sns.boxplot(x='GarageCars', y='SalePrice', data=train_data, palette='GnBu')
title = plt.title('House Price by Garage Size')

Year Built
The age of the house also plays an important role in its price. Newer houses have higher average prices. There are several houses built before 1900 having a high price.
plt.figure(figsize=(15, 6))
sns.scatterplot(x='YearBuilt', y='SalePrice', data=train_data)
title = plt.title('House Price by Year Built')

2.3. Categorical Variables
Using ANOVA, I have identified 15 categorical features having p-values lower than 0.01:
sigCatCols = [
    'Street', 'LandContour', 'LotConfig', 'LandSlope', 'Neighborhood',
    'Condition1', 'Condition2', 'RoofMatl', 'ExterQual', 'BsmtQual',
    'BsmtExposure', 'KitchenQual', 'Functional', 'GarageQual', 'PoolQC'
]
Let's explore some of them.
def visualizeCatFeature(feature):
    """
    Visualize the relationship between `SalePrice` and categorical feature using box plots
    """
    # Descending order of levels sorted by median SalePrice
    featOrder = train_data.groupby(
        [feature]).median().SalePrice.sort_values(ascending=False).index

    # Create box plot
    sns.boxplot(x=feature,
                y='SalePrice',
                data=train_data,
                order=featOrder,
                palette='GnBu_r')
Neighborhood
There is a big difference in house prices among neighborhood in Ames. The top 3 expensive neighborhoods are NridgHt, NoRidge and StoneBr with median house prices of approximately $300,000, three times as high as the median of the 3 cheapest neighborhoods, which are BrDale, DOTRR and MeadowV.
plt.figure(figsize=(12, 6))
visualizeCatFeature('Neighborhood')
title = plt.title('House Price by Neighborhood')
tick = plt.xticks(rotation=45)

Roof Material
Houses using Wood Shingles roof are the most expensive with price ranging from \$300,000 to \\$450,000. There are also a lot of expensive houses using Standard Composite Shingle roof.
plt.figure(figsize=(8, 6))
visualizeCatFeature('RoofMatl')
title = plt.title('House Price by Roof Material')

Kitchen Quality
Kitchen Quality is another important feature to predict house price. There is a very big difference in price between houses with different kitchen quality. For example, the average price difference between a house with a good kitchen and one with an excellent kitchen is about $120,000.
plt.figure(figsize=(8, 6))
visualizeCatFeature('KitchenQual')
title = plt.title('House Price by Kitchen Quality')

2.4. Correlations
# Create correlation matrix from train data excluding `SalePrice`
corr_mat = train_data.iloc[:, :-1].corr()

# Select correlations greater than 0.5
high_corr_mat = corr_mat[abs(corr_mat) >= 0.5]

# Plot correlation heatmap
plt.figure(figsize=(15, 10))
sns.heatmap(high_corr_mat,
            annot=True,
            fmt='.1f',
            cmap='GnBu',
            vmin=0.5,
            vmax=1)
title = plt.title('Correlation Heatmap')

There is multicollinearity in our training data. Below features are highly correlated:
- GarageCars and GarageArea
- GarageYrBlt and YearBuilt
- 1stFlrSF and TotalBsmtSF
- GrLivArea and TotRmsAbvGrd
Multicolliniearity has a negative impact on our prediction models and makes standard errors of our estimates increase. Therefore, for each pair of highly correlated features, I will remove a feature that has a lower correlation with SalePrice.
2.5. Missing Values
Most machine learning algorithms give an error when we train them on data with missing values. Therefore, it's important to identify them before deciding how to handle them (drop features or impute missing value).
missing_data_count = X.isnull().sum()
missing_data_percent = X.isnull().sum() / len(X) * 100

missing_data = pd.DataFrame({
    'Count': missing_data_count,
    'Percent': missing_data_percent
})
missing_data = missing_data[missing_data.Count > 0]
missing_data.sort_values(by='Count', ascending=False, inplace=True)

print(f"There are {missing_data.shape[0]} features having missing data.\n")
print("Top 10 missing value features:")
missing_data.head(10)
plt.figure(figsize=(12, 6))
sns.barplot(y=missing_data.head(18).index,
            x=missing_data.head(18).Count,
            palette='GnBu_r')
title = plt.title("Missing Values")

With some basic understandings of the data set and features, let's move to data preprocessing and modeling steps.
3. Data Preprocessing and Feature Engineering
3.1. Missing Values
missing_data_count = X.isnull().sum()
missing_data_percent = X.isnull().sum() / len(X) * 100
missing_data = pd.DataFrame({
    'Count': missing_data_count,
    'Percent': missing_data_percent
})
missing_data = missing_data[missing_data.Count > 0]
missing_data.sort_values(by='Count', ascending=False, inplace=True)
missing_data.head(10)
There are 34 features that have missing values. I will divide them into three groups based on the data description:
Group 1 - Categorical variables where
NAmeans no feature:PoolQC,MiscFeature,Alley,Fence,FireplaceQu,GarageType,GarageFinish,GarageQual,GarageCond,BsmtQual,BsmtCond,BsmtExposure,BsmtFinType1,BsmtFinType2,MasVnrType(15 variables)For this group I will impute
NAwith'None'.Group 2 - Numerical variables where
NAmeans no feature:GarageArea,GarageCars,BsmtFinSF1,BsmtFinSF2,BsmtUnfSF,TotalBsmtSF,BsmtFullBath,BsmtHalfBath,MasVnrArea(10 variables)For this group I will impute
NAwith0.Group 3 - Other variables:
Functional,MSZoning,Electrical,KitchenQual,Exterior1st,Exterior2nd,SaleType,Utilities,LotFrontage,GarageYrBlt(9 variables)- I will impute
Functional,MSZoning,Electrical,KitchenQual,Exterior1st,Exterior2nd,SaleType,Utilitieswith their modes, - impute
LotFrontagewith its mean, - impute
GarageYrBltwithYearBuilt.
- I will impute
from sklearn.impute import SimpleImputer
# Group 1:
group_1 = [
    'PoolQC', 'MiscFeature', 'Alley', 'Fence', 'FireplaceQu', 'GarageType',
    'GarageFinish', 'GarageQual', 'GarageCond', 'BsmtQual', 'BsmtCond',
    'BsmtExposure', 'BsmtFinType1', 'BsmtFinType2', 'MasVnrType'
]
X[group_1] = X[group_1].fillna("None")

# Group 2:
group_2 = [
    'GarageArea', 'GarageCars', 'BsmtFinSF1', 'BsmtFinSF2', 'BsmtUnfSF',
    'TotalBsmtSF', 'BsmtFullBath', 'BsmtHalfBath', 'MasVnrArea'
]

X[group_2] = X[group_2].fillna(0)

# Group 3:
group_3a = [
    'Functional', 'MSZoning', 'Electrical', 'KitchenQual', 'Exterior1st',
    'Exterior2nd', 'SaleType', 'Utilities'
]

imputer = SimpleImputer(strategy='most_frequent')
X[group_3a] = pd.DataFrame(imputer.fit_transform(X[group_3a]), index=X.index)

X.LotFrontage = X.LotFrontage.fillna(X.LotFrontage.mean())
X.GarageYrBlt = X.GarageYrBlt.fillna(X.YearBuilt)
Let's check whether there is any missing value left:
sum(X.isnull().sum())
Great! All missing values have been handled.
3.2. Outliers
Because regression models are very sensitive to outlier, we need to be aware of them. Let's examine outliers with a scatter plot.
sns.set_style('darkgrid')
plt.figure(figsize=(8, 6))
sns.scatterplot(x='GrLivArea', y='SalePrice', data=train_data)
title = plt.title('House Price vs. Living Area')

There are two observations lying separately from the rest. They have large living area but low price. They are the outliers that we are looking for. I will delete them from the training set.
outlier_index = train_data[(train_data.GrLivArea > 4000)
                           & (train_data.SalePrice < 200000)].index
X.drop(outlier_index, axis=0, inplace=True)
y.drop(outlier_index, axis=0, inplace=True)
3.3. Feature Engineering
3.3.1. Create New Variables
In this step I will create new features from weaker features in the training data. For example, the surface area of each floor has low correlation with house price; however, when we sum them up, the relationship becomes much stronger. In fact, TotalSqFeet becomes the strongest feature in the dataset. The new features I will create are total square feet, total number of bathrooms, age of the house, whether the house was remodeled, and whether the house was sold in the same year it was built.
X['totalSqFeet'] = X['TotalBsmtSF'] + X['1stFlrSF'] + X['2ndFlrSF']
X['totalBathroom'] = X.FullBath + X.BsmtFullBath + 0.5 * (X.HalfBath + X.BsmtHalfBath)
X['houseAge'] = X.YrSold - X.YearBuilt
X['reModeled'] = np.where(X.YearRemodAdd == X.YearBuilt, 0, 1)
X['isNew'] = np.where(X.YrSold == X.YearBuilt, 1, 0)
3.3.2. Label Encoding
Ordinal categorical features are label encoded.
from sklearn.preprocessing import LabelEncoder

# Ordinal categorical columns
label_encoding_cols = [
    "Alley", "BsmtCond", "BsmtExposure", "BsmtFinType1", "BsmtFinType2",
    "BsmtQual", "ExterCond", "ExterQual", "FireplaceQu", "Functional",
    "GarageCond", "GarageQual", "HeatingQC", "KitchenQual", "LandSlope",
    "LotShape", "PavedDrive", "PoolQC", "Street", "Utilities"
]

# Apply Label Encoder
label_encoder = LabelEncoder()

for col in label_encoding_cols:
    X[col] = label_encoder.fit_transform(X[col])
3.3.3. Transform Numerical Variables to Categorical Variables
Because I have calculated age of houses, YearBuilt is no longer needed. However, YrSold could have a large impact on house price (e.g. In economic crisis years, house price could be lower). Therefore, I will transform it into categorical variables.
Like YrSold, some numerical variables don't have any ordinal meaning (e.g. MoSold, MSSubClass). I will transform them into categorical variables.
to_factor_cols = ['YrSold', 'MoSold', 'MSSubClass']

for col in to_factor_cols:
    X[col] = X[col].apply(str)
3.4. Skewness and Normalizing Variables
Normal distribution is one of the assumption that linear regression relies on. Therefore, transfoming skewed data will help our models perform better.
First, let's examine the target variable SalePrice with Distribution plot and Quantile-Quantile plot.
Target variable
from scipy import stats
from scipy.stats import norm
def normality_plot(X):
    """
    1. Draw distribution plot with normal distribution fitted curve
    2. Draw Quantile-Quantile plot
    """
    fig, axes = plt.subplots(1, 2, figsize=(10, 5))

    sns.distplot(X, fit=norm, ax=axes[0])
    axes[0].set_title('Distribution Plot')

    axes[1] = stats.probplot((X), plot=plt)
    plt.tight_layout()
normality_plot(y)

One of the methods to normalize right-skewed data is using log transformation because big values will be pulled to the center. However, log(0) is Nan, so I will use log(1+X) to fix skewness instead.
y = np.log(1 + y)
And this is SalePrice after log transformation. The sknewness has been fixed.
normality_plot(y)

In the next step I will examine skewness in the rest of numerical variables and use log transformation to fix them,
Fixing skewness in other numerical variables
If skewness is less than -1 or greater than 1, the distribution is highly skewed.
If skewness is between -1 and -0.5 or between 0.5 and 1, the distribution is moderately skewed.
If skewness is between -0.5 and 0.5, the distribution is approximately symmetric.
Below are skewed features in our original train data.
skewness = train_data.skew().sort_values(ascending=False)
skewness[abs(skewness) > 0.75]
Let's check normality of GrLivArea:
normality_plot(X.GrLivArea)

# List of skewed columns
skewed_cols = list(skewness[abs(skewness) > 0.5].index)

# Remove 'MSSubClass' and 'SalePrice'
skewed_cols = [
    col for col in skewed_cols if col not in ['MSSubClass', 'SalePrice']
]

# Log-transform skewed columns
for col in skewed_cols:
    X[col] = np.log(1 + X[col])
Below is normality of GrLivArea after log-transformation. Skewness has been fixed.
normality_plot(X.GrLivArea)

3.5. Feature Scaling
Except for Decision Tree and Random Forest, it is highly recommended to standardize the data set before running machine learning algorithms since optimization methods and gradient descent run and converge faster on similarly scaled features.
However, outliers can often influence the sample mean and standard deviation in a negative way, and models like Lasso and Elastic Net are very sensitive to outliers. In such cases, the median and the interquartile range often give better results. I will use RobustScaler to transform the training data.
from sklearn.preprocessing import RobustScaler
numerical_cols = list(X.select_dtypes(exclude=['object']).columns)
scaler = RobustScaler()
X[numerical_cols] = scaler.fit_transform(X[numerical_cols])
3.6. One-hot Encoding
X = pd.get_dummies(X, drop_first=True)
print("X.shape:", X.shape)
After preprocessing the train and test data, I split them again to perform modeling.
ntest = len(test_data)
X_train = X.iloc[:-ntest, :]
X_test = X.iloc[-ntest:, :]
print("X_train.shape:", X_train.shape)
print("X_test.shape:", X_test.shape)
4. Modeling
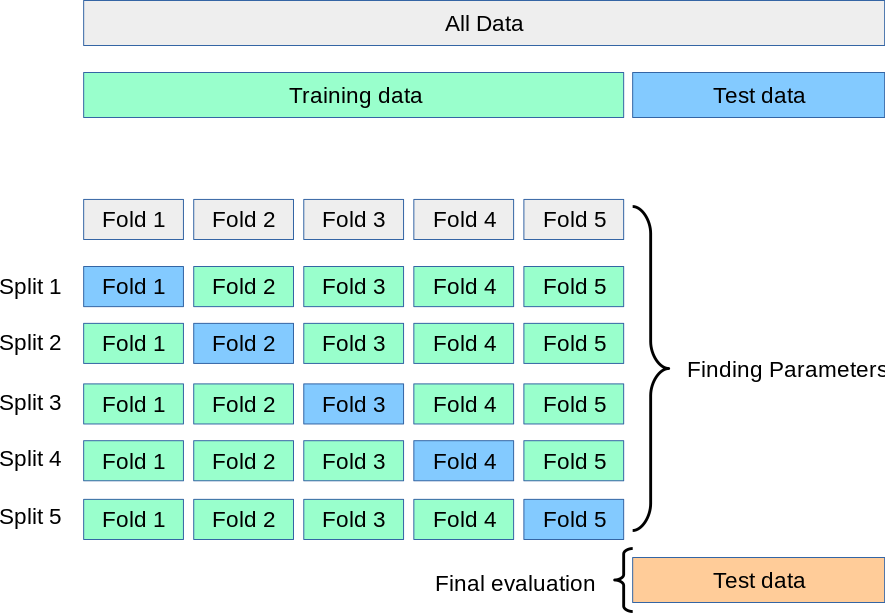
In model evaluation, it's a common practice to split the entire training data into 2 sets of data (train and test). However, a model may work very well on a set of test data but have a poor performance on other sets of unseen data.
A solution to this problem is a procedure called cross-validation (CV). In the example below, under the basic approach, called k-fold CV, the training set is split into 5 smaller sets. Then, for each fold, a model is trained using the other 4 folds and evaluated on the remaining fold. The performance measure reported by k-fold cross-validation is then the average of the values computed in the loop.
I will write a function to get the Root Mean Squared Logarithmic Error (RMSLE) for my models using cross-validation. There is one note here: because I have transformed the target variable to log(1+y) , the Mean Squared Error for log(1+y) is the Mean Squared Logarithmic Error for SalePrice.
from sklearn.model_selection import KFold, cross_val_score

n_folds = 5


def getRMSLE(model):
    """
    Return the average RMSLE over all folds of training data.
    """
    # Set KFold to shuffle data before the split
    kf = KFold(n_folds, shuffle=True, random_state=42)

    # Get RMSLE score
    rmse = np.sqrt(-cross_val_score(
        model, X_train, y, scoring="neg_mean_squared_error", cv=kf))

    return rmse.mean()
4.1. Regularized Regressions
from sklearn.linear_model import Ridge, Lasso
4.1.1. Ridge Regression
In the regularized linear regression (Ridge), we try to minimize:
$$ J(\theta) = \frac{1}{2m} \left( \sum_{i=1}^m \left( h_\theta\left( x^{(i)} \right) - y^{(i)} \right)^2 \right) + \frac{\lambda}{2m} \left( \sum_{j=1}^n \theta_j^2 \right)$$where $\lambda$ is a regularization parameter which controls the degree of regularization (thus, help preventing overfitting). The regularization term puts a penalty on the overall cost J. As the magnitudes of the model parameters $\theta_j$ increase, the penalty increases as well.
I will find the $\lambda$ that gives me the smallest RMSLE from cross-validation:
lambda_list = list(np.linspace(20, 25, 101))

rmsle_ridge = [getRMSLE(Ridge(alpha=lambda_)) for lambda_ in lambda_list]
rmsle_ridge = pd.Series(rmsle_ridge, index=lambda_list)

rmsle_ridge.plot(title="RMSLE by lambda")
plt.xlabel("Lambda")
plt.ylabel("RMSLE")

print("Best lambda:", rmsle_ridge.idxmin())
print("RMSLE:", rmsle_ridge.min())

ridge = Ridge(alpha=22.9)
4.1.2. Lasso Regression
Lasso Regression is very similar to Ridge regression. One difference is that in the regularization term, instead of using sum of squared of $\theta$, we use sum of absolute value of $\theta$:
$$ J(\theta) = \frac{1}{2m} \left( \sum_{i=1}^m \left( h_\theta\left( x^{(i)} \right) - y^{(i)} \right)^2 \right) + \frac{\lambda}{2m} \left( \sum_{j=1}^n |\theta_j| \right)$$Another big difference is that Ridge Regresion can only shrink parameters close to zero while Lasso Regression can shrink some parameters all the way to 0. Therefore, we can use Lasso Regression to perform feature selection and regression.
With the same method above, the best lambda_ for my Lasso model is 0.00065.
lambda_list = list(np.linspace(0.0006, 0.0007, 11))
rmsle_lasso = [
    getRMSLE(Lasso(alpha=lambda_, max_iter=100000)) for lambda_ in lambda_list
]
rmsle_lasso = pd.Series(rmsle_lasso, index=lambda_list)

rmsle_lasso.plot(title="RMSLE by lambda")
plt.xlabel("Lambda")
plt.ylabel("RMSLE")

print("Best lambda:", rmsle_lasso.idxmin())
print("RMSLE:", rmsle_lasso.min())

lasso = Lasso(alpha=0.00065, max_iter=100000)
4.2. XGBoost
Following this complete guide of parameter tuning for XGBoost, I respectively tune and find the best parameter for n_estimators max_depth min_child_weight gamma subsample colsample_bytree reg_alpha reg_lambda learning_rate.
from xgboost import XGBRegressor
xgb = XGBRegressor(learning_rate=0.05,
                   n_estimators=2100,
                   max_depth=2,
                   min_child_weight=2,
                   gamma=0,
                   subsample=0.65,
                   colsample_bytree=0.46,
                   nthread=-1,
                   scale_pos_weight=1,
                   reg_alpha=0.464,
                   reg_lambda=0.8571,
                   silent=1,
                   random_state=7,
                   n_jobs=2)
getRMSLE(xgb)
4.3. LightGBM
LightGBM is a powerful gradient boosting framework based on decision tree algorithm. Like XGBoost, LightGBM has a high performance on large data sets but much faster training speed than XGBoost does. Following this guide, I have tuned the parameters num_leaves min_data_in_leaf max_depth bagging_fraction feature_fraction max_bin. As you can see in the RMSLE reported below, for this data set LightGBM has better performance than XGBoost.
from lightgbm import LGBMRegressor
lgb = LGBMRegressor(objective='regression',
                    learning_rate=0.05,
                    n_estimators=730,
                    num_leaves=8,
                    min_data_in_leaf=4,
                    max_depth=3,
                    max_bin=55,
                    bagging_fraction=0.78,
                    bagging_freq=5,
                    feature_fraction=0.24,
                    feature_fraction_seed=9,
                    bagging_seed=9,
                    min_sum_hessian_in_leaf=11)
getRMSLE(lgb)
4.4. Averaging Model
Regularized regression and gradient boosting work very differently and they may perform well on different data points. Thus it is a good practice to get average predictions from these models. Below I create a new class for my averaging model.
from sklearn.base import BaseEstimator, RegressorMixin, TransformerMixin, clone


class AveragingModel(BaseEstimator, RegressorMixin, TransformerMixin):
    def __init__(self, models):
        self.models = models

    def fit(self, X, y):
        # Create clone models
        self.models_ = [clone(x) for x in self.models]

        # Train cloned models
        for model in self.models_:
            model.fit(X, y)

        return self

    def predict(self, X):
        # Get predictions from trained clone models
        predictions = np.column_stack(
            [model.predict(X) for model in self.models_])

        # Return average predictions
        return np.mean(predictions, axis=1)
avg_model = AveragingModel(models=(ridge, lasso, xgb, lgb))
getRMSLE(avg_model)
The RMSLE score of the averaging model is much better than any of base models. I will use this model as my final model. In the last step, I will train my final model on the whole training data, make predictions from the test data and save my output.
my_model = avg_model
my_model.fit(X_train, y)
predictions = my_model.predict(X_test)
final_predictions = np.exp(predictions) - 1
output = pd.DataFrame({'Id': test_data.index, 'SalePrice': final_predictions})
output.to_csv('submission.csv', index=False)
5. Conclusion
In this project, I have conducted a detailed EDA to understand the data and important features. Based on exploratory analysis, I performed data preprocessing and feature engineering. Finally, I train regularized regression models (Ridge, Lasso), XGBoost and LightGBM, and take average predictions from these models to predict final price of each house. By the time I write this notebook, my best model has Mean Absolute Error of 12293.919, ranking 95/15502, approximately top 0.6% in the Kaggle leaderboard.
6. Reference
Below are some excellent notebooks about this dataset that I have read and learned a lot from, including smart techniques such as Q-Q plots and averaging model:
- Stacked regressions to predict house prices
- Comprehensive data exploration with Python
- Regularized linear models
Thank you for reading. I hope you enjoy it. Please feel free to contact me if you have any question. If you are interested in other projects that I have done, please visit my website at https://chriskhanhtran.github.io/.
Other projects: